
One of these – the last one – is a longer “trick” and more like a tutorial than anything. I hope you forgive me the length of this skirt hack, because I find it terribly useful.
Bloomer Alternatives
If you’re not big on bloomers – and, as someone who wears mine only infrequently, I can understand why you wouldn’t be a fan – there are a lot of alternatives you can use. Pajama shorts are becoming a popular alternative to bloomers, but I have a few more suggestions.
Split slips are probably something you haven’t looked at all that much, but they are an absolute favorite item of mine both in and out of Lolita. Made of the same fabric as traditional slips but cut as a loose pair of shorts, split slips can be worn in place of bloomers or under regular skirts or dresses. And, as an added bonus, they don’t stick to the innards of your petti as much as cotton bloomers do.
If you prefer something a little closer to the body, try running shorts. My cousins live this one because they’re runners; when workout gear is ever-present, it’s easy for them to pull together at a moment’s notice. Running shorts have another benefit, too: they keep everything in place. If you’re a frequent wearer of tights, as I am, you know how hard it can be to keep them from moving about on you. Running shorts double as spanx and do just that.
De-Scuffing White Shoes
Scuffs on white shoes are the worst! But, they’re easier to clean than you might think. Mr. Clean Magic Erasers (or any other sort of erasing sponge thing) will erase those scuffs in no time.
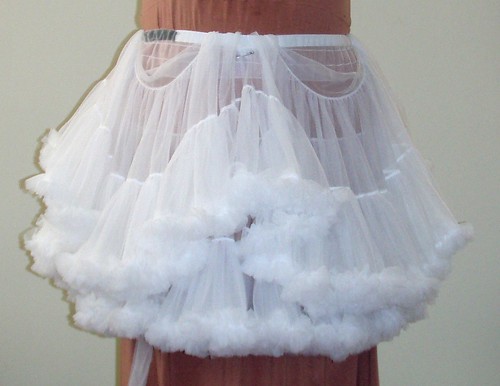
A-Line to Cupcake Petticoat
This one certainly isn’t mine, but it’s well worth knowing. I primarily buy a-line petticoats, and this basic trick really does help reshape them. When you are wearing a skirt that is bell-shaped and you need fullness at the top of the petti, take the top layer and tuck it into the waistband; add safety pins for more security.
 |
| Source |
Weight Loss and Waistbands
Lost weight? You do not have to get rid of your old skirts with fitted waistbands. This is one of those things that I do all the time with both my Lolita skirts and my regular clothes. It also works well if you’ve fallen in love with a skirt that is too big for your waist.
This is my first time cobbling together a diagram, so please forgive the wonkiness of these images. I just wanted to make sure there were pictures for those who are more visual in the way they think about crafts.


Use a seam ripper to remove one to two inches of that stitching near the end. Do this on both ends of the waistband (for example, both the end with the button and the end with the buttonhole).

Then, take some elastic that is a little less wide than your waistband and insert it into the waistband (tack it down with a safety pin it on the end that you aren’t pulling through so you don’t lose it!). Fit and trim as needed until you’ve got a skirt that fits snugly at your waist. If you want to make sure the elastic is a little extra stable, zigzag stitch the end of the elastic to keep it from fraying.

Once you’ve done that, stitch down the end of the elastic on both ends so that it stays in place. In the diagram, I’m representing the elastic within the waistband with a gray block. When you do this, you want to make sure you actually catch the end of the elastic under the fabric. You might even want to do a double row of stitching for added stability.

Finally, close up the spaces you made with coordinating thread. And now you have a skirt that fits again.
I hope you’ve gotten some use out of these tips, and I’d love to hear some of your own.
I love split slips, they are so comfy!
ReplyDelete